Quick links
- exams.math.buffalo.edu/zoom - portal for accessing exam Zoom meeings (from phone/tablet).
- exams.math.buffalo.edu - portal for accessing exam problems (from a computer).
- www.gradescope.com - Gradescope.
- gradescope.ubmath.info - Gradescope instructions.
2-device proctored exams
This guide provides instructions for taking proctored exams in courses offered by the UB Math Department. The setup of the exam requires students to use two devices:
- a computer, to access the exam
- a smartphone or tablet equipped with a camera to access an exam Zoom meeting.
Math Department staff members proctor the exams via students’ smartphone/tablet cameras.
Software installation and setup
Zoom app
In order to join a proctored exam meeting you will need to have the Zoom app installed on your smartphone or tablet. This app is available for both Android and iOS devices.
To access exam Zoom meetings you need to be signed into Zoom with your UB account. If you are signed in with another account, you can follow these steps to switch to your UB account:
- In the Zoom app, sign out from the non-UB account (go to Settings > My Profile, then scroll down to the bottom).
- Click Sign In and then choose SSO where it says SIGN IN WITH.
- Type
buffalowhere it says Enter your company domain. - On the next screen log in using your UB username and password.
Microsoft Office Lens
At the conclusion of the exam you will need to scan pages with your solutions using your phone or tablet, and save the scan as a PDF file. Install the Microsoft Office Lens scanning app on your smartphone or tablet. The app is available for both Android and iOS devices. If needed, refer to the online instructions on how to use Office Lens on Android and iOS. Practice using this app to create PDF files, in particular learn how to create PDFs consisting on multiple pages. Here is a short video demonstrating the use of Office Lens.
Gradescope
In your course the instructor may choose a different way of submitting exams that Gradescope (e.g. using UBLearns). In such case, ignore the instructions below and follow the instructions provided by the course instructor.
Gradescope is where you will be submitting the exam for grading, (and also where you will go to see your score once the exam is graded).
- Set up your Gradescope account following the instructions in this guide to Gradescope.
- Practice uploading to Gradescope. Your course instructor will likely give you a brief assignment for practice. Make sure you match each page of the file you upload to Gradescope with the appropriate question number.
Your exam workspace
Your exam workspace should be in a quiet location with no one else around. Remember: this is an exam, you will need to concentrate!
During the exam, you are not allowed to use any calculators or consult any references (e.g. cheat sheets, formula sheets, note cards, textbooks, websites, etc) unless it is specified otherwise by the course instructor. Also, you must not wear headphones or earbuds. Here is a short video demonstrating proper workspace setup.
Here is what you will need to take the exam:
- A computer with an internet connection.
- A smartphone or tablet with an internet connection, and with Zoom and Office Lens apps installed. Make sure that your device is fully charged or it is connected to a charger.
- A Gradescope account.
- UB student ID (or a government issued photo ID).
- Pen or pencil.
- Blank paper.
- Desk or table clear of any items, besides those listed above.
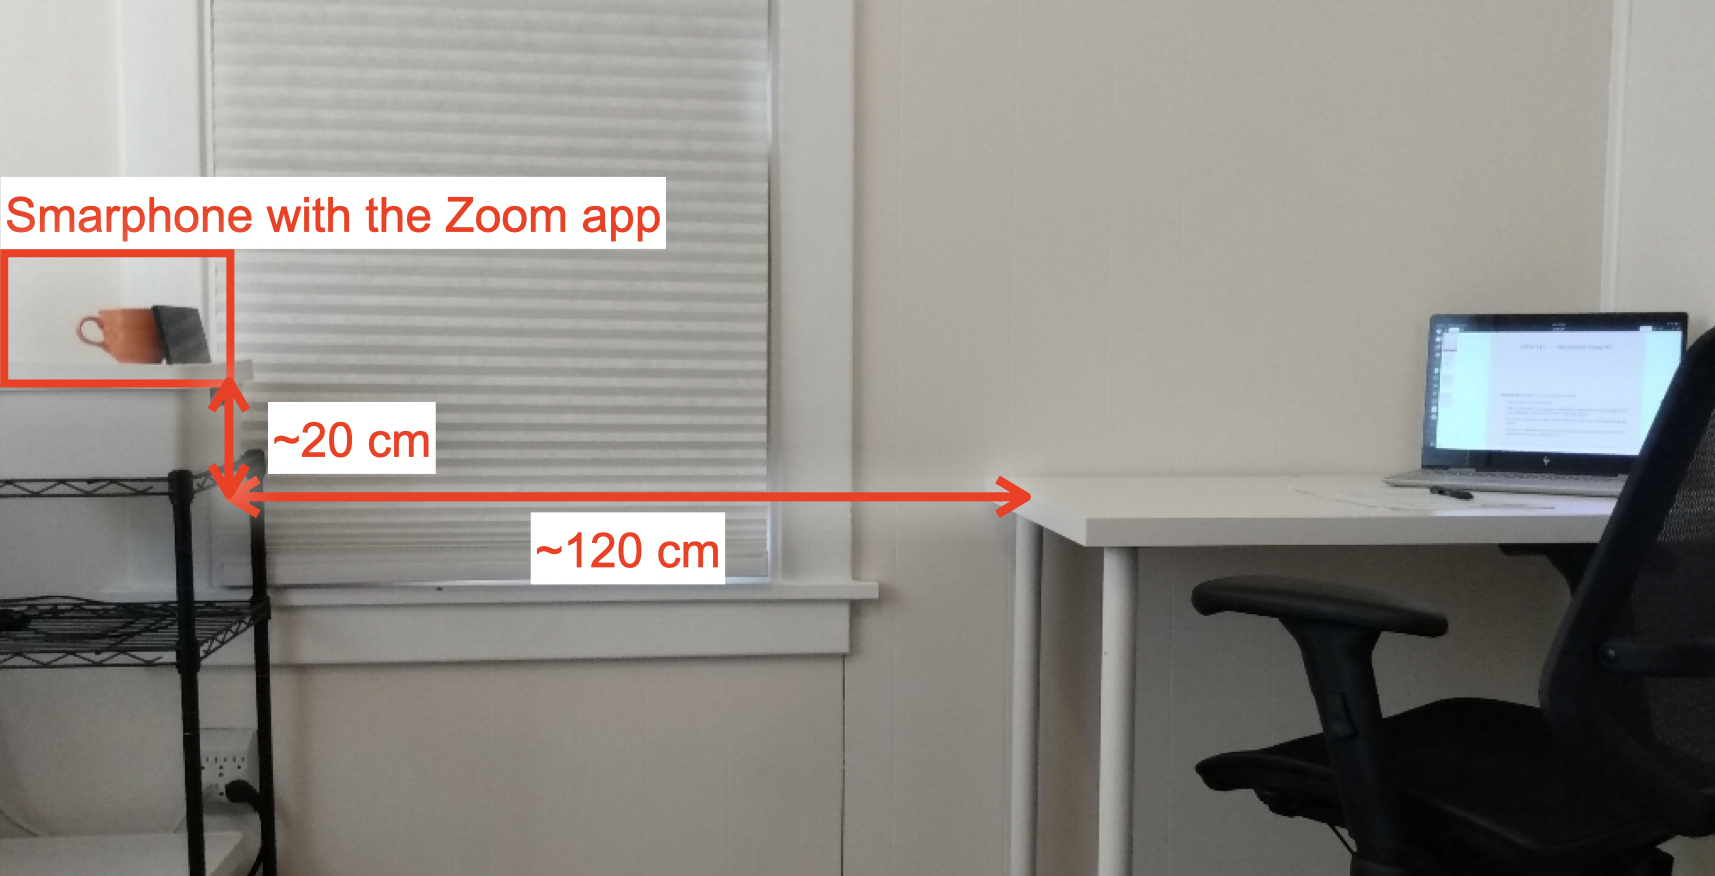
Zoom device setup
Your Zoom device must use the front-facing (selfie) camera for the Zoom meeting (so that the screen is facing towards you). The device must be positioned in the landscape mode and placed about 4 ft (120 cm) away from your work area and about 10 inches (20 cm) above the work surface. It must receive a clear view of:
- your computer screen and keyboard (and mouse if any)
- your face and your hands
- your entire writing surface and the papers you are writing on.
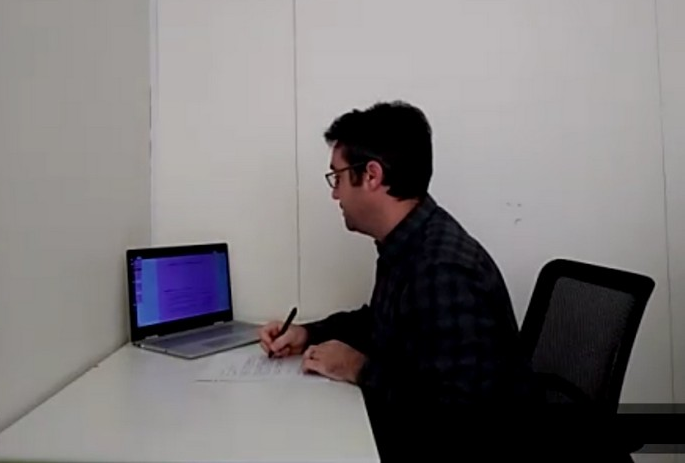
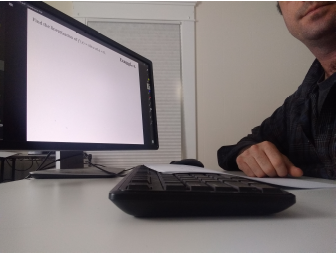
Correct camera view
This is how that the view from a camera should look. The student, the entire work surface, and the computer screen are clearly visible.
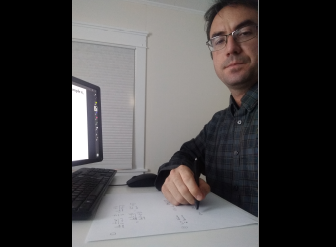
Examples of incorrect camera views
Most of the issues illustrated below can be fixed by placing the camera further away from you.
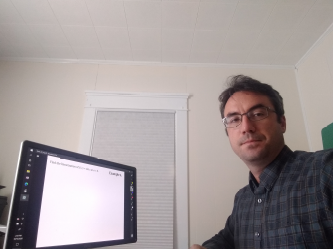
⚠ Work surface not visible.
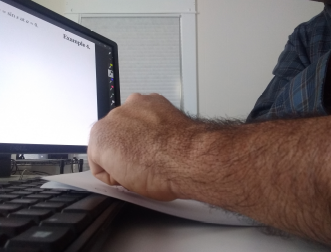
⚠ Camera too close.

⚠ Part of the computer screen not visible.
⚠ Face not visible.

⚠ Computer screen not in the picture.
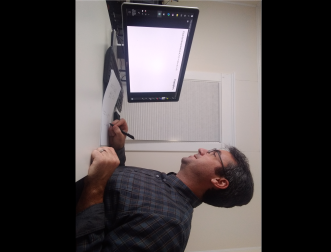
⚠ Video oriented vertically. To fix this, pick up the phone, wave it around a bit, and set it back down.
⚠ Camera oriented vertically, partial view of the monitor and work surface only.
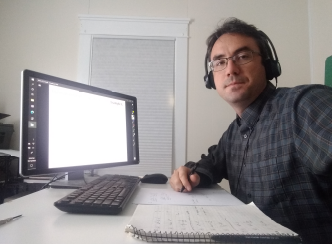
⚠ Headphones/earbuds are not allowed.
Taking the exam
1. Join the Zoom proctored meeting
- Prepare your UB student ID - you will need to show it to the proctor when you get admitted to the exam Zoom meeting.
- Join the Zoom meeting on your smartphone by going to the page exams.math.buffalo.edu/zoom You will be asked to enter your UBIT username and password. On the follwing page, click the button “Click here to go to the assigned meeting”, which will launch a Zoom meeting. Note that you will need to be signed into Zoom using your UB Zoom account to join the exam Zoom meeting. You should be in the Zoom meeting about 10 minutes prior to the start of the exam, so the proctor can check you in before the exam begins.
-
Set your Zoom device to use the front-facing (selfie) camera.
-
Turn the video on, the speaker on and volume loud enough so that you can hear the proctor, but not so loud that you will be disturbed by occasional verbal interactions of the proctor with other students during the exam. Turn your microphone off (you can unmute yourself temporarily if you need to talk to the proctor).
2. Follow the proctor’s instructions
- Position your Zoom device as described above in Zoom Device Setup.
- Follow any additional instructions from the proctor.
3. Access the exam questions
- On your computer, in a web browser, access the following URL: exams.math.buffalo.edu. You will need to enter your UBIT username and password to access this page.
- Wait for the proctor to announce the exam password.
- Enter the exam password, click Go to access the exam questions, and begin work on the exam.
4. Answer the exam questions
- One-side only: write your solutions on blank sheets of paper using one side of the paper only.
- Question numbers: clearly label your work with the corresponding question number.
- Space between questions: leave some blank space between your work for different questions (~3cm).
- Space for ID: leave an empty spot on each page where you will place your Photo ID when taking pictures of your work for submitting them to Gradescope.
- One Page: for each question, write all of your answer on the same page if possible:
- If you are unsure your solution will fit in the remaining space on the current page, start the problem on a new page.
- In the case where multiple pages of work are needed, clearly indicate that your solution is continued on another page.
5. Checkout
Once you are finished answering the questions:
- Make a stack of all pages of your work in preparation for showing them to the Zoom device.
- Use the raise hand feature to let the proctor know that you are ready to leave the exam, and wait for the proctor to call upon you.
- Move your Zoom device directly over your stack of pages, and repeatedly remove the top page until you've shown the whole stack Pause on each page for about 1 second, so the camera can focus.
- When you have completed this procedure, leave the Zoom meeting and proceed to Step 6.
Important
The following behavior will considered an act of Academic Dishonesty with serious consequences
(such as an F on the exam or a course failure):
- Leaving the Zoom meeting without checking out.
- Uploading to Gradescope any page that was not shown to the Zoom Device during checkout or was subsequently altered.
6. Submit your work
Once you exit the Zoom Proctoring Session you will have 10 minutes to upload a single PDF file of your work. For submitting your solutions you will use Gradescope, UBLearns or a different method that will be explained by the course instructor prior to the exam. Exams will not be accepted after this deadline. Do not write or alter anything on your pages once you leave the Zoom proctored meeting.
- Scan all the pages of your work using the Office Lens app, and convert to a single PDF file. Place your Photo ID on an empty section of each page, so that both your work and the ID are visible in each picture.
- Upload the PDF file to Gradescope, UBLearns etc.. (It may be easier if you email the file to yourself first, and then use your computer to go through the upload process.)
- If your course is using Gradescope, make sure that you match each page of your work with the corresponding question on Gradescope.
Here is a short video demonstrating the process of uploading your work to Gradescope and matching pages with questions. Gradescope information is also available here .
Viewing graded exams
If your course uses Gradescope for exam submissions, to check your exam score, log in to Gradescope and click on a course tile. This will bring you to a page with a list of assignments for this course. Assignments which have been already graded will show your score in the Status column.
- Click on the assignment to see the score for each question.
- Click on each assignment question to see any comments from the grader.
If your course does not use Gradescope, the course instructor will let you know how to access your graded exam.
Respondus Lockdown Browser
Some instructors may choose to allow you to access the exam only via Respondus Lockdown Browser. If your course instructor tells you that this is the case, install the Respondus LockDown Browser on your computer. You need to use the installer link below, as it will install the version of Respondus that has been preconfigured to work with UBLearns.
- Installer (this will start the installation process).
- Instructions from UBIT.
Note:
- Even if you have installed Respondus on your computer in the past (possibly for the ALEKS exam), you need to re-install using the link above.
- Respondus only runs on Mac OS and Windows. It cannot be used on Chrome OS or Linux distributions.
